
So i was hit by the crafting bug the other day and trust me when i get an idea in my head i HAVE to do it. I won't stop talking about it until its done either, my hubs deals with me and thats why i love him OH so much! So my front door has been naked for way to long and i found this cute little wood ladder in the trash the day we moved in (almost a year ago) and I've always known i wanted to do something with it, and so when i was planning on spending a few days at my parents ranch i knew that this was the perfect time to accomplish this project! I had someone to watch my daughter and the space to make a mess! So i took my ladder and had my dad add a little "extension" behind the step...see pic...all he did was cut a piece of old wood and screw it to a base which was then screwed to the bottom of the ladder step, thus creating a "wider" step. I then took some paint that they had left over and painted my ladder giving it a fresh look, kinda rustic color. It turned out just how i thought it would, maybe even a little better! And it only took maybe 2hrs to complete start to finish.
Heres a pic of the ladder, i forgot to take step by step pics but it was easy enough that i think you get the point.
Later that night i cleaned out the clay pot plants that i found laying around the ranch, and painted the base of pots with chalkboard paint. Im obsessed with chalkboard paint, if you can't tell already! Look at how cute the pots look! Im going to plant herbs in them and write the name of the herb on the outside and place them on my new ladder! Cute, different, and a new look for my front door! I just love it all!
I also made a little welcome sign, the wood post kinda goes with the same look of my ladder and i thought it would be cute it add a little sign to the mix. All i need to do is find a cute door mat and I'm done! Best part is...this was all free!!!!
BTW- Im doing all these projects with a 21month old, as well as being 30weeks prego! So if i can do this then so can YOU!
Thursday, July 5, 2012
Tuesday, July 3, 2012
Painted Wine Glasses
So my mom turned 50 this year and i had a BLAST putting her party together. We did a "Taste of Italy" theme, it was so pretty...my parents live in Temecula (wine country) and have a stunning view. So it just fit perfectly. Well i had MANY crafts that i did and would have done WAY more but time was against me. This is one of my favorite projects.... and i turned it into the guest party favors as well. I went to ikea and bought 80 wine glasses both red and white and painted the stems of each glass with chalkboard paint. That way each guest could write there own name on a glass and they wouldn't get mixed up another party goer!


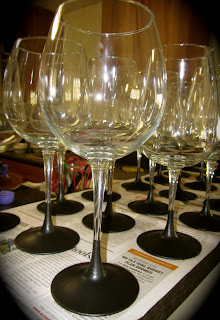
These were SO EASY to make!

I pealed off the stickers on the bottom, and gave them a quick wipe

I bought my chalkboard paint from Lowes, used a foam brush, and painted 3-4 coats of paint on each glass. I let each coat dry about 5 min.

And here is the final product! Fun to make, but more fun to drink from!
Cheers!
Monday, July 2, 2012
Play Dough!
Since its getting way to hot outside to take my little girl out to play I'm looking for things to keep her busy inside the house....Today we made an awesome Play-dough recipe! Seriously my daughter played with this for hours! I enjoyed playing too! It take maybe 10 minutes to make, its cheap, and it lasts!!


You Will Need :

1 Cup Water
1 Cup Flour
1/4 Cup Salt
2 Teaspoon Cream of Tarter
1 Tablespoon Vegetable Oil
Food Coloring
Directions:
Mix everything together (expect the food coloring, if you want more then 1 color)

Cook on medium low until it becomes sticky...kinda like this...

I added about 6 drops of food coloring, and it only took a few minutes and then i took it out and kneaded it on my counter until it was soft and playable!

And can you tell SHE LOVED IT!!!

Im thinking i may make a big batch of all colors and turn them into party favors for her 2nd bday party! They would also be great Bday / Christmas gifts for the kids in your life!
Have fun and enjoy being a kid again =)
Shock Top Cupcakes
First of all i LOVE shock top beer so when i saw a recipe for cupcakes my mouth just had to make them! They were so yummy!!!! I have never baked anything with beer so i was really interested to see how they would turn out. I followed this recipe posted by Girl Likes To Eat, thanks for sharing they were SO YUMMY! Now my mind is thinking of other beers to try with this. Next time i may try it with a cream cheese frosting.... This was really easy too! Start with a white cake box mix and follow the instructions but INSTEAD OF WATER USE BEER! Here is the recipe :

(Cupcakes)You Will Need:
1 Box of White Cake Mix (Any brand is fine)
1 1/2 Cups Shock Top Beer
1/3 Cup Vegetable Oil
3 Egg Whites
Zest of 1 Large Orange
Directions :
Pre-heat oven
Follow the directions on the back of the cake mix for Cupcakes, but use Shock Top instead of water!
Add in the Orange Zest
Fill Cupcake Liners 3/4 full
Bake (Mine took a little longer to cook so make sure to do the toothpick check!)
Now for the frosting! You Will Need:
If you have a Kitchen Aid bust it out for this one! Your arms will get tired if you don't!
2 Egg Whites
1Teaspoon of Vanilla
1 Tablespoon of Orange Juice ( I used a fresh orange)
Mix all these ingredients for about 10minutes....until soft and fluffy
So you can start on the 2nd part of the frosting
In a sauce pan mix :
1Cup of sugar
1/3 Cup of Shock Top
1/4 Teaspoon Cream of Tarter
Cook on medium heat until nice and bubbly,
Slowly add the sugar mixture to the egg whites mixture and continue to beat for another 10 minutes
This needs to be STIFF! Like Marshmallow Cream!
I put my frosting in the fridge for about 30 min so it could chill before i iced my cupcakes.
Then i toped with remaining orange zest for a "pretty" look!
ENJOY!

Subscribe to:
Comments (Atom)